
Materials & Tools:
Shopping List:
4 – 2"x8"x8'
1 – 2"x4"x8'
1 – 2"x6"x10'
1 – 1"x2"x8'
3 – 1"x4"x8'
1 – 4"x4"x8' [cedar post for legs]
16 – 1"x3"x8' [for bed slats, these come in bundles of 10 and are really cheap]
*All lumber = untreated pine unless otherwise noted
2 ½” pocket hole screws or wood screws
2” finish nails
wood glue
wood putty
Tools:
measuring tape
square
pencil
drill
circular saw
mitre saw
sander
countersink drill bit
finish nailer / compressor
wood chisel
wood chisel
Cut List:
2 – 2x8 @ 80” [frame sides]
2 – 2x8 @ 80” [frame sides]
2 – 2x8 @ 63” [frame head & foot]
1 – 2x4 @ 80” [slat ledgers]
1 – 2x6 @ 80” [center slat support]
1 – 2x4 @ 80” [slat ledgers]
1 – 2x6 @ 80” [center slat support]
1 – 1x2 @ 60” [head trim]
1 – 1x4 @ 60" [foot trim]
2 – 1x4 @ 84 1/2" [side trim]
4 – 4x4 @ 22" [all 4 legs should come from 1 cedar post] 2 – 1x4 @ 84 1/2" [side trim]
16 – 1x3 @ 59 7/8" [slats]
Instructions:
Instructions:
*Read all instructions before beginning this project. Also, make sure to pre-drill all holes so the screws don't split the wood. Countersink all screws to enable patching with wood filler to conceal screw heads.
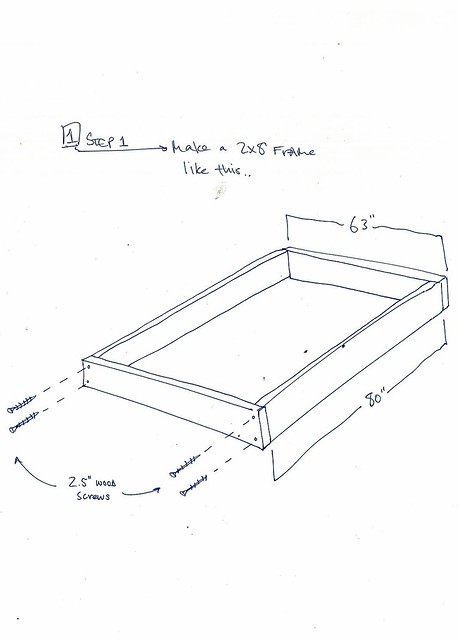
Step 1:
Build 2x8 frame as shown, fastening head and foot 2x8 onto ends of side 2x8s with wood glue and 2 1/2" wood screws.
Step 1:
Build 2x8 frame as shown, fastening head and foot 2x8 onto ends of side 2x8s with wood glue and 2 1/2" wood screws.
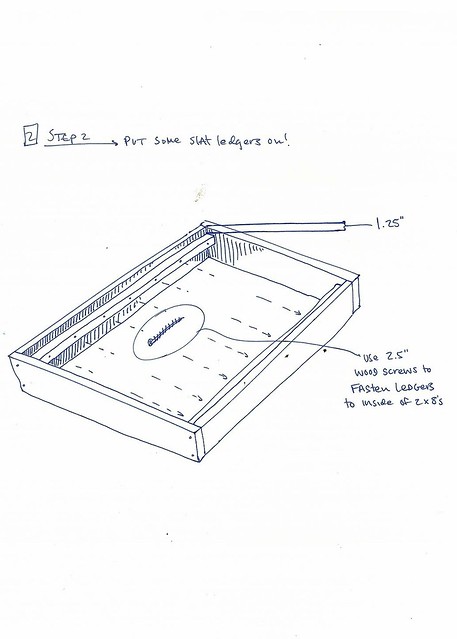
Using circular saw, rip [cut in half length wise] 2x4 making [2] 2x2s. Fasten 2x2 ledgers to inside of 2x8 frame with wood glue and 2 1/2" wood screws as shown, 1 1/4" below top of 2x8.
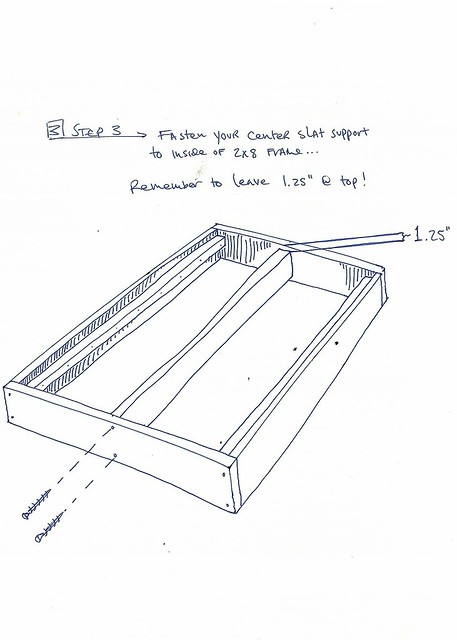
Step 3:
Fasten 2x6 center support to head and foot 2x8s using 2 1/2" wood screws as shown, 1 1/4" below the top of 2x8s [center support should be on level with 2x2 ledgers].
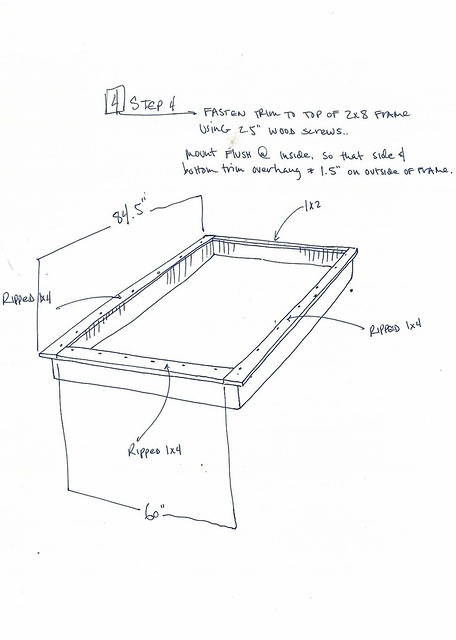
Step 4:
Trim time! Using circular saw, rip 1/2" off of your [3] 1x4s, making them true 1x3s. Add 1x3 trim to top of frame [sides first], keeping flush with inside of side 2x8s and at head of bed as shown, using wood glue and 2 1/2" wood screws.
Next, add head [1x2 trim] and foot [1x3] trim in similar fashion.
 Step 5:
The legs. You can be as crafty or unoriginal as you want here. We chose to use the cedar 4x4 to increase sturdiness, and because we love cedar [maybe it'll keep the moths away]. This part can be a bit tricky, but the point is to form a mechanical connection between the frame and the legs, adding a ton of strength. [Mike likes saying "mechanical connection"...]. Make sure to refer to the pictures.
Set blade depth on circular saw to 1/2" and create a 3 1/2" notch on two sides of each 4x4 by completing following steps:
1. Measure 3 1/2" down from top of 4x4, and cut 1/2" deep cross ways along 3 1/2" line
Next, add head [1x2 trim] and foot [1x3] trim in similar fashion.
The legs. You can be as crafty or unoriginal as you want here. We chose to use the cedar 4x4 to increase sturdiness, and because we love cedar [maybe it'll keep the moths away]. This part can be a bit tricky, but the point is to form a mechanical connection between the frame and the legs, adding a ton of strength. [Mike likes saying "mechanical connection"...]. Make sure to refer to the pictures.
Set blade depth on circular saw to 1/2" and create a 3 1/2" notch on two sides of each 4x4 by completing following steps:
1. Measure 3 1/2" down from top of 4x4, and cut 1/2" deep cross ways along 3 1/2" line
2. Continue to cut multiple 1/2" deep lines cross ways. The goal is to leave as little wood as possible from the 3 1/2" mark to the top of the 4x4. Once cuts are made, you should have a bunch of wafer thin 1/2" deep pieces of wood in between cuts.
3. Using claw side of hammer, knock out wafers and smooth the notch you've created with a wood chisel.
4. Repeat on adjacent side of 4x4.
When finished, you should have [4] notched legs that the bed frame can actually sit on. Seat bed frame onto legs and fasten legs to inside of frame using wood glue and 2 1/2" wood screws.
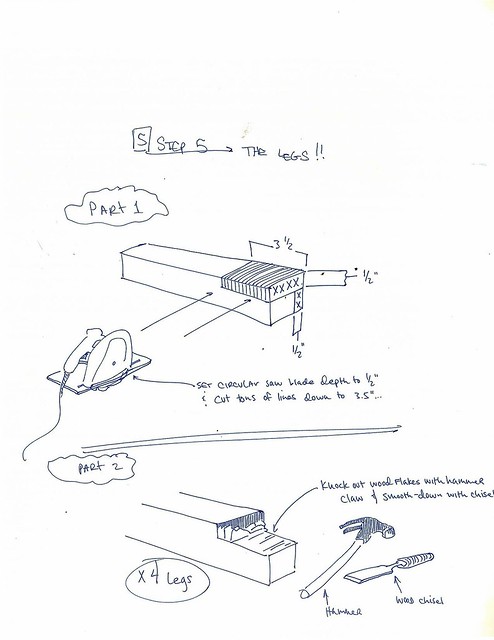
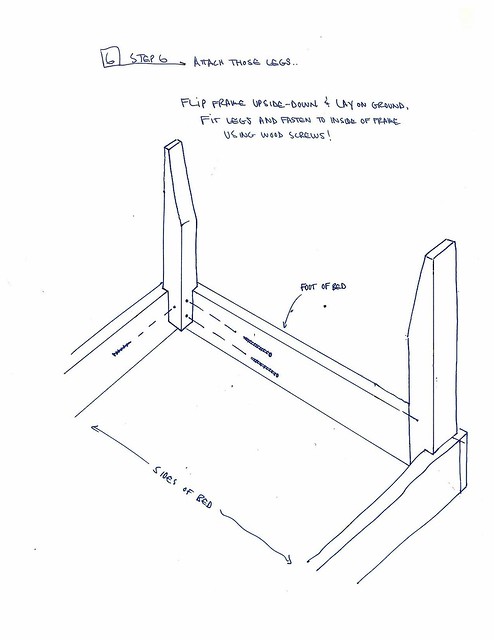
Step 6:
Attach the legs. You'll want to flip the frame upside down to do this. Once the frame is upside down, fit the legs into position. Screw them into the frame with wood screws as shown.
*All drawings are thanks to Mike! (:
No comments:
Post a Comment